Lightboard is Open Source Hardware. You are welcome to use it freely.
This miniaturization is based off Michael Peshkin’s detailed Lightboard instructions.
You can visit his site https://lightboard.info/home.html or email him directly at peshkin@northwestern.edu.
I was inspired to redesign the Lightboard for tabletop and webcam use due to my immersion in Emergency Response Teaching. I like to think of teaching during this pandemic like Owen Hunt from Grey’s Anatomy thinks about trauma surgery – doing something when doing nothing means they die. Of course what I do in my online environment is a far cry from trauma surgery. But my efforts in my new educational environment are improved by the creativity I found in Michael Peshkin. And thus, Lightboard Table Top was born.
The design is very simple, taking advantage of some of the physical properties of the materials used. In addition, I was able to keep the costs low while still utilizing high quality materials. In total I spent $160 to build this tool.
- (24″ x 18″) 10 MM Starphire Float (Part Number FLSP-10MM) from Crystal Glass for $81.90.
- (11″ x 26″) 2″ Oak Lumber from Windsor Plywood for $41.64.
- LE LED Strip Lights, 16.4ft 12V Dimmable Strip Lights, 6000K Daylight White from Amazon for $26.24.
- Red Oak Wood Stain from Home Depot for $10.05
- Arrow Fastener 205 5/16-Inch T20 Narrow Flat Crown Staples from Amazon for $5.05
- 1-inch Nail-On Furniture Glides from Home Depot for $6.88
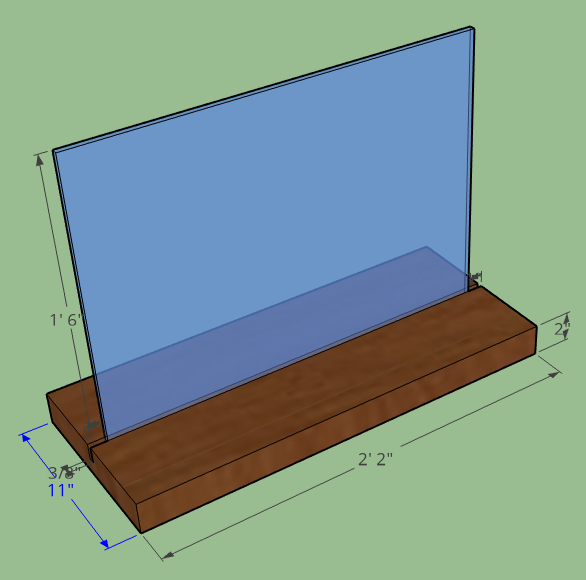
I’ve created this sketch post-construction:

The base needed to be heavier than the glass itself to provide stability and wide enough so it didn’t tip over. A 2:3 weight ratio was estimated by the sales associate and myself at Windsor Plywood, thus we chose oak for the base.
The glass is set into a 1″ deep groove that my friend Augie volunteered his table saw to create. We cut it such that the glass slips into the grove easily. Were we a bit more careful it might have fit perfectly, alas we needed to cut some wedges to shim the glass up tight against one side of the groove so that the glass supports itself.
I’m a teacher, so of course i have like… 20 different dry erase markers at home. My own testing and my deep review of effective markers has revealed definite winners. My preference are the Quartet Neon dry-erase markers as they erase really well but the Expo Neon dry-erase markers show up a little bit brighter at the expense of a bit of greasiness. Wiping the glass off with a dry roll of toilet paper seems to be the most effective solution I’ve found thus far.
The result was stunning:
The lights are just scotch-taped around the outside. And controlled by a dimmer switch.
The tricky part was the webcam. I had to jerry-rig my webcam to broadcast a mirror image so that the writing showed up forwards instead of backwards.
To do this I had to access my camera driver. I found a round-about way to do so instead of accessing the driver directly. ManyCam has a free version that I downloaded. After connecting my webcam to ‘Preset 1’ I right-clicked on the main image, chose ‘properties’, clicked on ‘driver properties’, then the ‘camera control’ tab, finally I checked the ‘Flip Horizontal’ checkbox. There was a lot of frustration and experimenting before I found this option.
You can use Manycam’s free version to broadcast the mirror image but I found that this slowed my computer down way too much and I was unable to provide live support. Changing the driver settings allowed me to broadcast the mirror image of my regular webcam.
Celebrations ensued as I felt this project had come to a successful climax!
I contacted Michael Peshkin afterwards for permission to share these specs to which he responded “That looks great! Feel free to share widely, no problem”!
I wish everyone well. I hope that this helps. Wash your hands!
*Featured image from https://lightboard.info/home/construction.html, June 4, 2020


